Greetings!
In this post, I will show the configuration process of Company ‘X’ virtual network using Ansible Roles, Jinja2 templates and Ansible playbooks for the development environment.
If you have not read the ‘Introduction’ post, it is a good starting point to understand what I will talk about.
Network at Day 0.
On that day, the Network Engineer has access to each device via SSH.
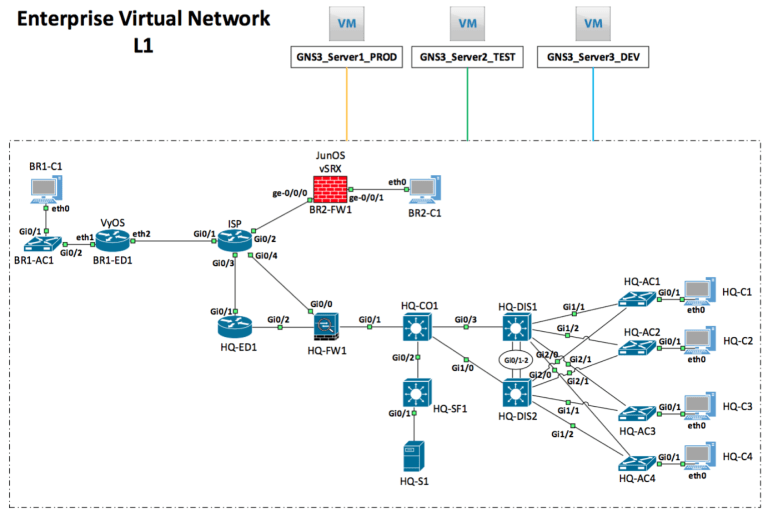
Also, all equipment is connected according to the L1 physical topology.
At this moment, the company’s network is not operational (waiting for settings).
The initial configuration of services and protocols occurs in the development environment.
The development environment is an isolated virtual (or physical) network (sandbox) for testing configurations and pre-tuning components of NaC model. For example, adding nodes to the Ansible ‘hosts’ file, describing groups, test connectivity to devices using NAPALM drivers, creating Ansible Roles, Jinja2 templates and network verification tests.
Ideally when ‘virtual network’ = ‘real physical network’, but it is very difficult to achieve.
In my example, the DEV environment is a separate GNS3 server which has an identical topology as in production and test environments.
I have all identical environments, which is probably a rarity in the real world. Firstly, I will configure all the virtual devices in the DEV environment. After that, I will copy this configuration to the TEST environment and then to PROD. The configuration process from TEST to PROD environments will be automated using the GitLab CI/CD pipeline.
So, let’s begin!
A legend of the fictional company ‘X’
The company ‘X’ wants to expand and open a new manufacturing business to produce ‘something’. The entire company is located in one country, but future factories will be located in different towns.
For example, the central office (HQ) is located in the ‘City1’ but manufacturing has two factories (BR1) in the ‘Town1’ and (BR2) in the ‘Town2’.
Currently, the company ‘X’ has old and an unstable existing ‘network’ in the central office (HQ) that cannot handle the load, so they decided to redo the entire ‘network’ from scratch.
For remote factories (BR1 and BR2), it is also necessary to make a new ‘network’ and connect branches the central office (HQ).
To do this, the company ‘X’ made an agreement with a company ‘Y’.
The Network Engineer from company ‘Y’ set to work.
After some time, they agreed all the documents, purchased, installed and physically connected all the equipment according to the L1 physical topology.
The next step is the configuration process …
In (HQ) all devices are ‘Cisco’ and the network was built on the traditional hierarchical LAN design that has three layers: access, distribution and core. Also, it has the ‘enterprise edge’ and ‘server farm’ areas.
The (BR1) of the company ‘X’ has a VyOS-based edge router and Cisco vL2 Switch.
The (BR2) of the company ‘X’ has only one ‘Juniper’ vSRX firewall/router device.
All devices are available for management via out-of-band management interfaces.
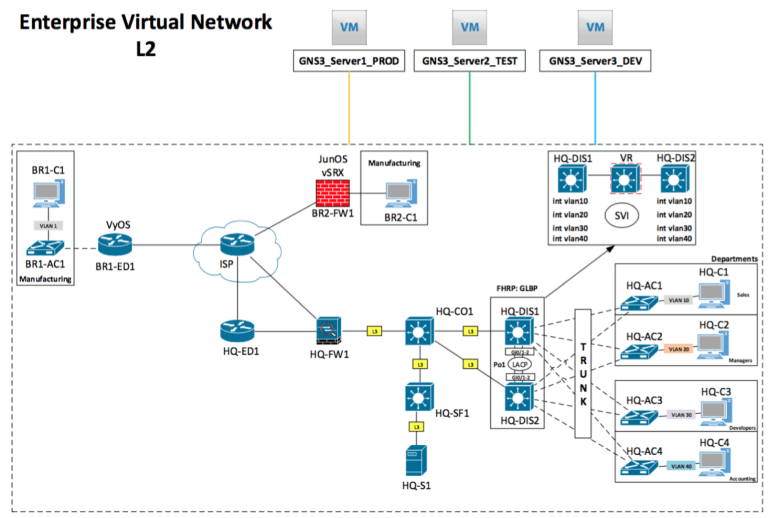
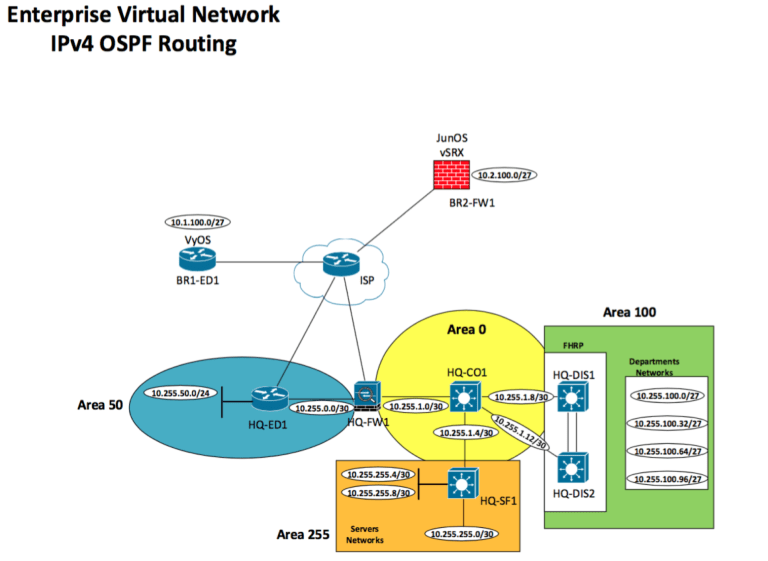
Network diagrams


Next is the configuration in the DEV environment,
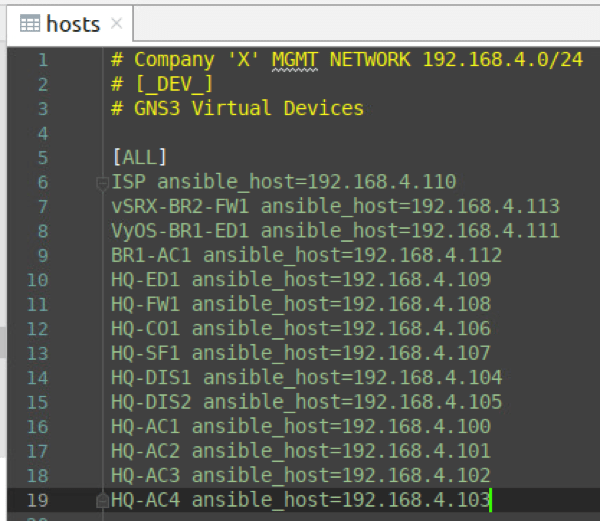
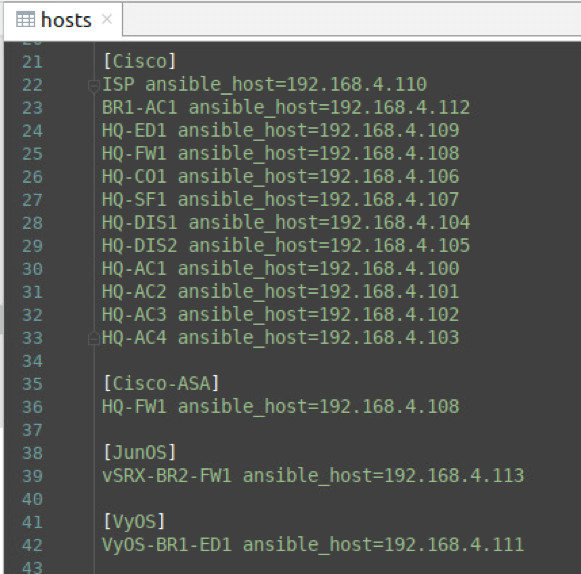
Preparation Ansible ‘hosts file’ about devices for management.
Jinja2 and Ansible Roles
‘Ansible roles’ are individual elements that contain Ansible playbooks (tasks) and jinja2 templates.
In my example, the ‘role’ is a block of code (template) of settings for a specific task.
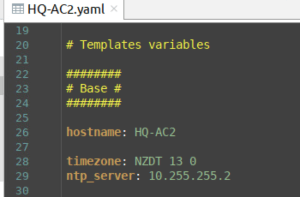
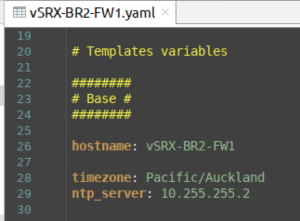
For example, the ‘basic_config’ block includes a basic set of settings for devices, such as NTP server, hostname, usernames, banners and etc.
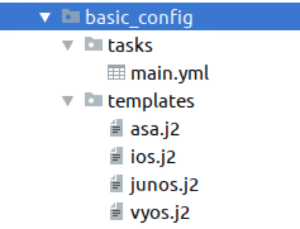
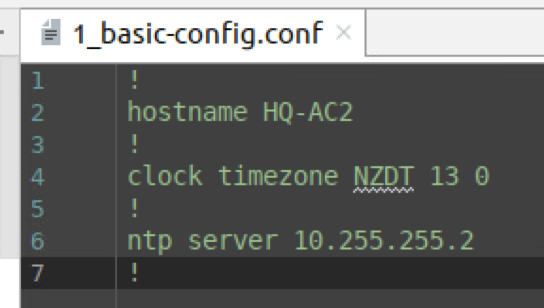
A folder ‘tasks’ – contains the ansible playbook (main.yml) which generates the ‘basic configuration’ in accordance with the ‘jinja2 template’ for a specific OS (ios.j2, vyos.j2 and etc) in the templates directory.
---
- name: generate basic-config from templates
  template: src=../templates/{{ansible_network_os}}.j2 dest={{config_dir}}/{{inventory_hostname}}/1_basic-config.conf
Example of Jinja2 template (ios.j2) in ‘basic_config’:
!
hostname {{ hostname }}
!
clock timezone {{ timezone }}
!
ntp server {{ ntp_server }}
!
{{ hostname }} – is a variable from ‘host_vars’ for a specific device.
Example of Jinja2 template (junos.j2) in ‘basic_config’:
system {
    host-name {{ hostname }};
    time-zone {{ timezone }};
    ntp {
        server {{ ntp_server }};
    }
}
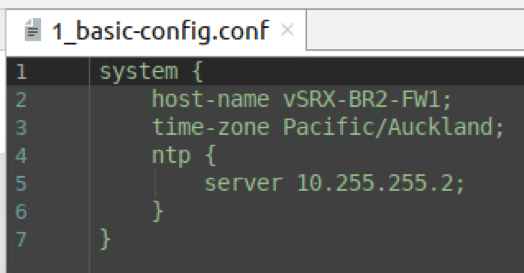
The main goal is to make a ‘Jinja2 template’ once for each vendor and then reuse it by changing only the value of variables in the ‘host_vars’ file for a specific device.
More examples:

More information:
https://docs.ansible.com/ansible/latest/user_guide/playbooks_reuse_roles.html
https://docs.ansible.com/ansible/latest/user_guide/playbooks_templating.html
Generating configurations
To generate a configuration for a specific device or group of devices,
I am using an ‘ansible playbook file’ that contains all the roles.
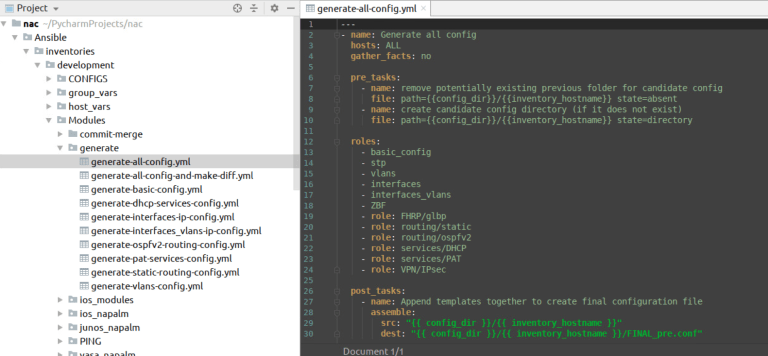
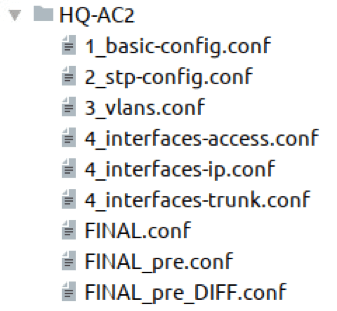
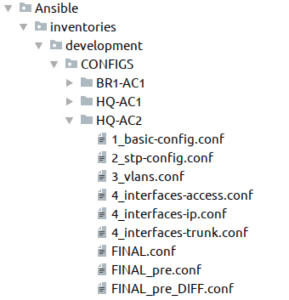
This is a local generation of configurations from jinja2 templates which will be located in the ‘CONFIGS’ folder when a generation process is done.
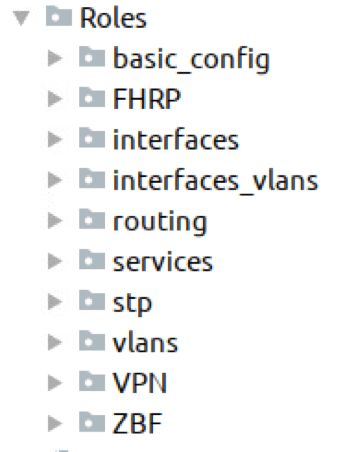
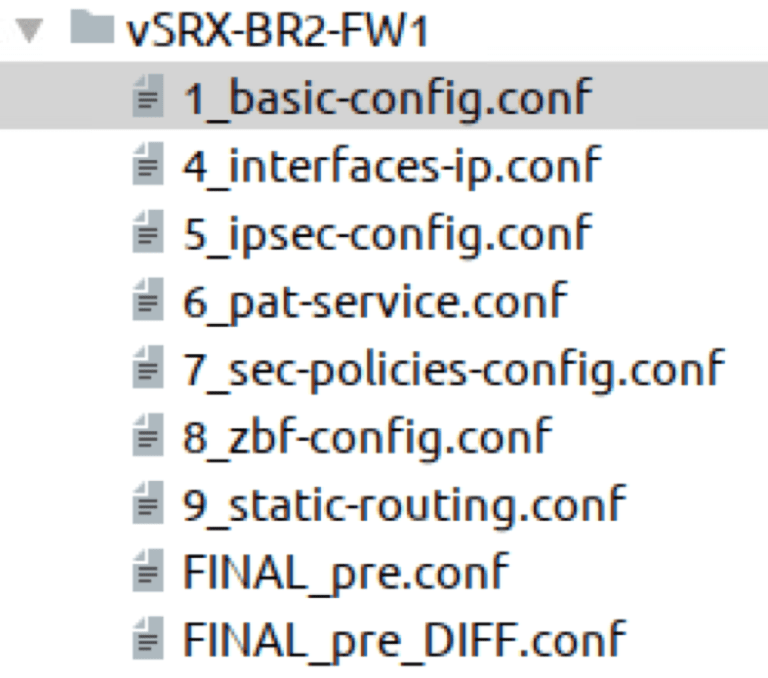
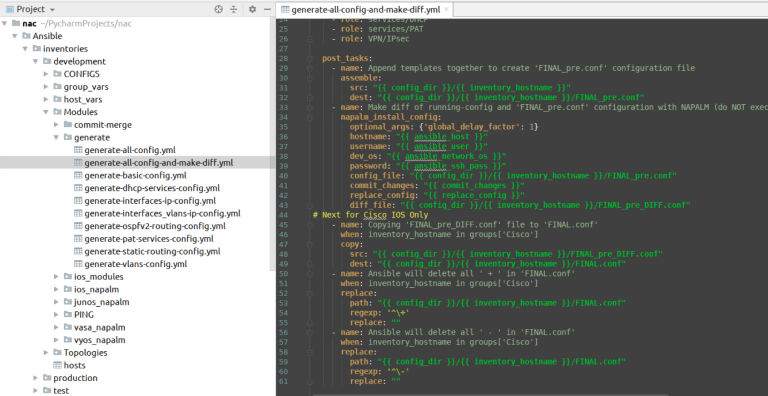
Each ‘Ansible role’ is a separate file:

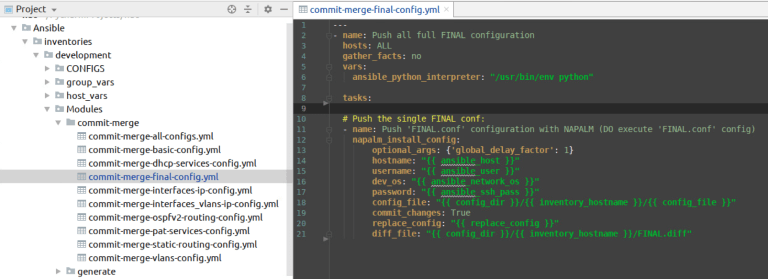
Using NAPALM ‘napalm_install_config’, I can see the difference between the locally generated configuration and the running configuration on the devices:
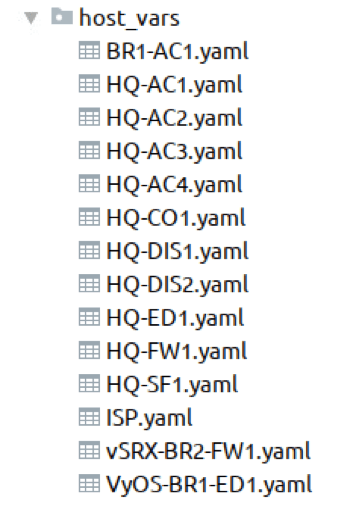
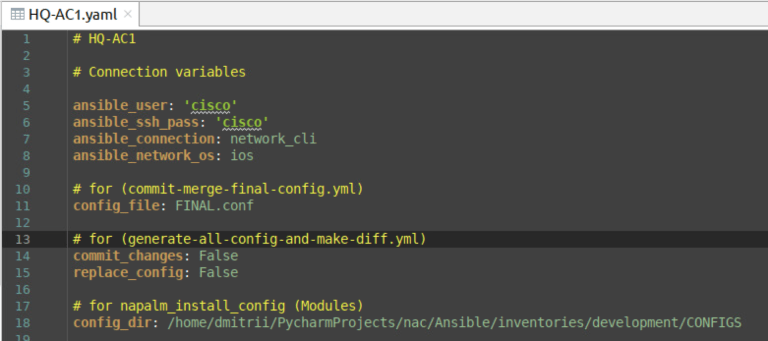
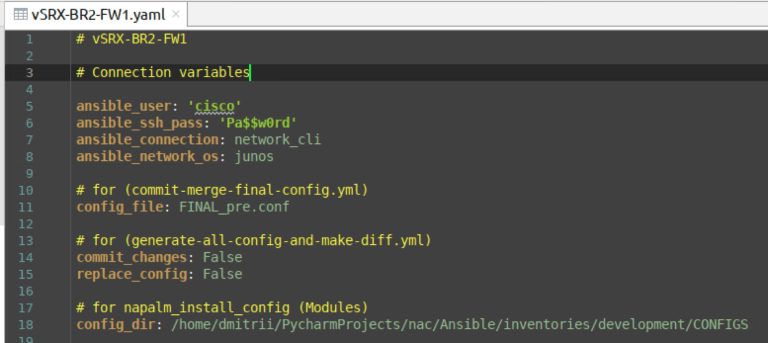
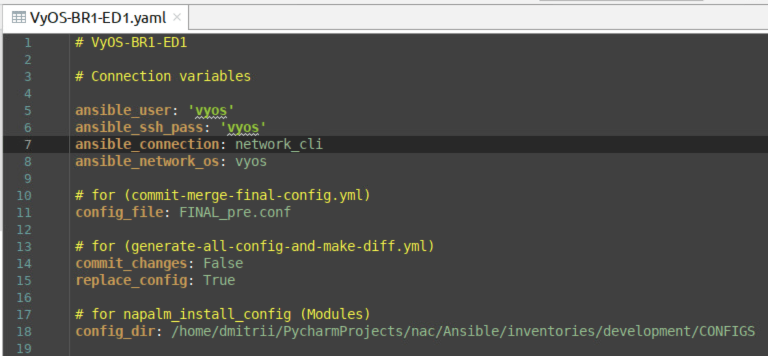
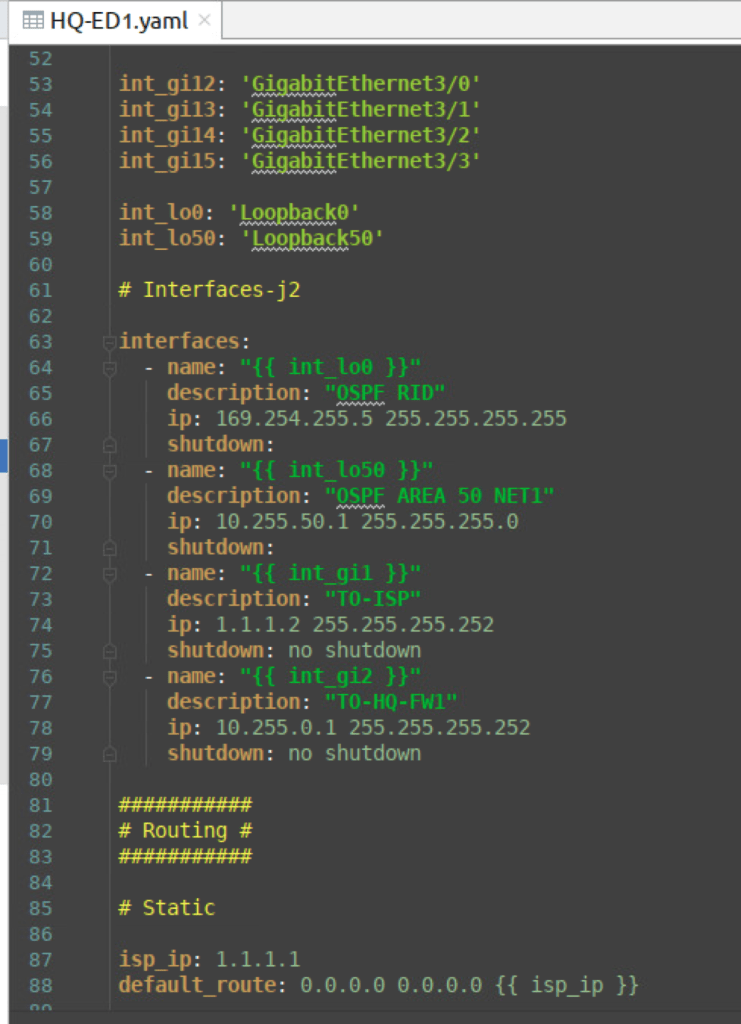
For example, HQ-ED1 (HQ-ED1.yaml) – host_vars:
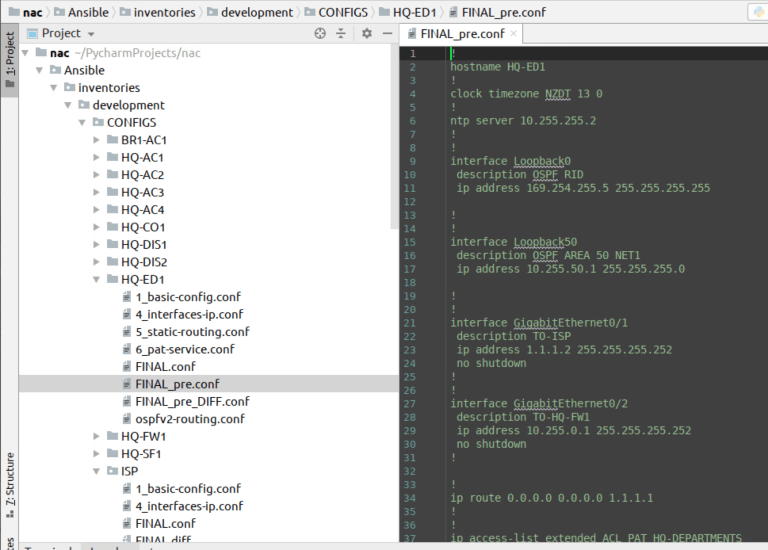
FINAL_pre.conf – is locally generated configuration of all roles in one single file.
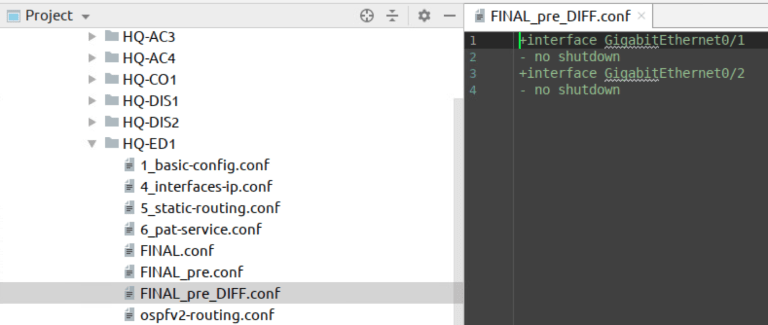
FINAL_pre_DIFF.conf – shows the difference between FINAL_pre.conf and running configuration on the device and displays the changes.
In short, compares the running-config and the local file.
Caveats of Cisco IOS:
https://napalm.readthedocs.io/en/latest/support/ios.html
FINAL.conf – contains the final configuration that will be executed on the device.
In short, a file that contains the final (cleared) configuration of the device after comparison.

Configuration execution (send commands to the devices)
To apply the configuration manually, I need to use the ‘ansible playbook file’ which uses the NAPALM ‘napalm_install config’ – ansible module to send the configuration to a specific device or on the group of devices.

To sum up,
Ansible Roles were created which describe the services/protocols used in the company ‘X’ network.
Now, each device in the company’s network is represented as a file with variables and their values.
Based on the variables from the ‘host_vars’ directory for each device, the configurations are generated and sent to the DEV devices.
An exception is Cisco ASA because it does not support ‘napalm_install_config’ ansible module, I will explain it later in the next posts.
At the moment, all devices in the DEV environment are configured according to the diagrams at the beginning of the post L1, L2, L3, IPv4 OSPF routing, VPNs.
The next step is to create network verification tests using the PyATS/Robot Framework.
P. S. At the end of the project, I will make my GitHub repository public that where the project files are located (startup configurations, ansible playbooks, docker-compose.yml and etc.)
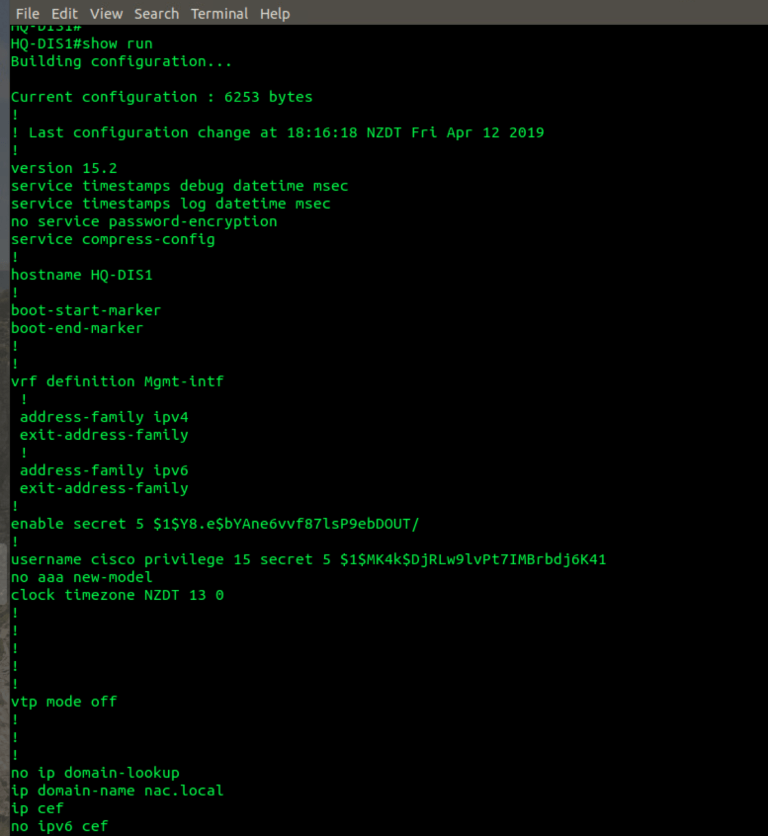
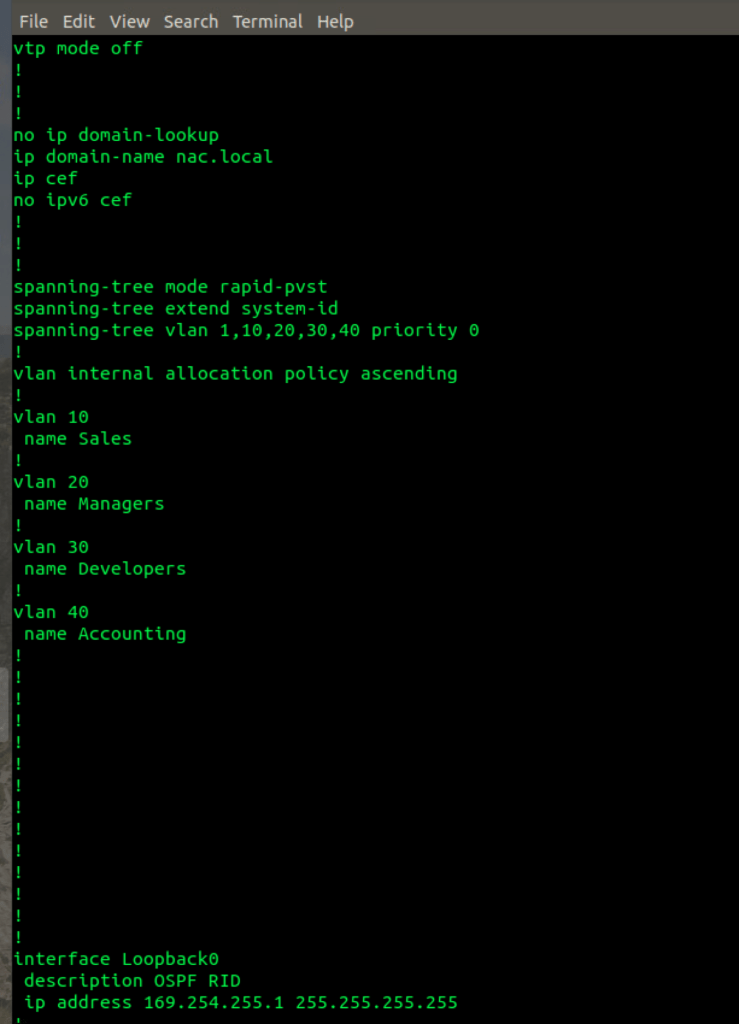
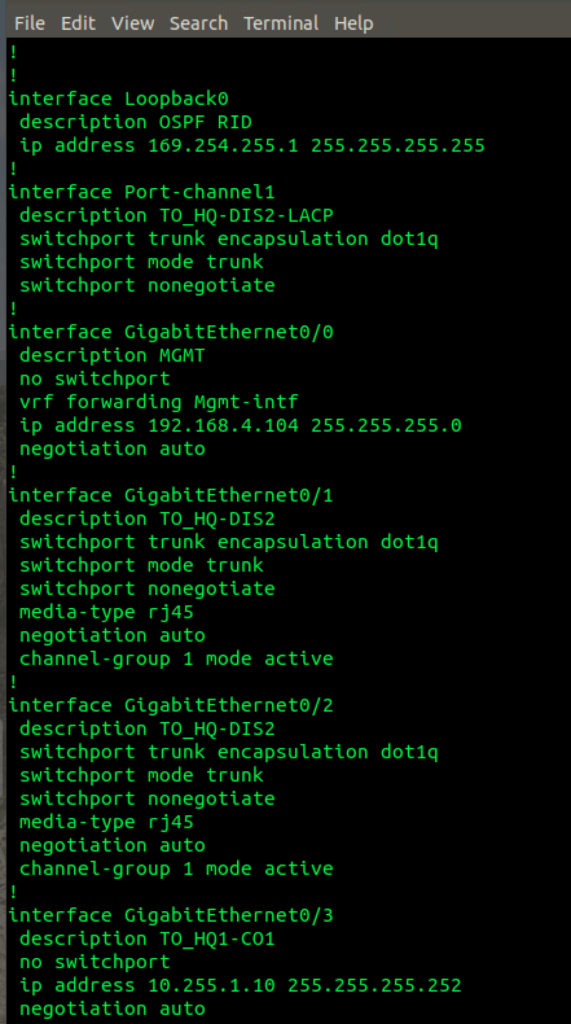
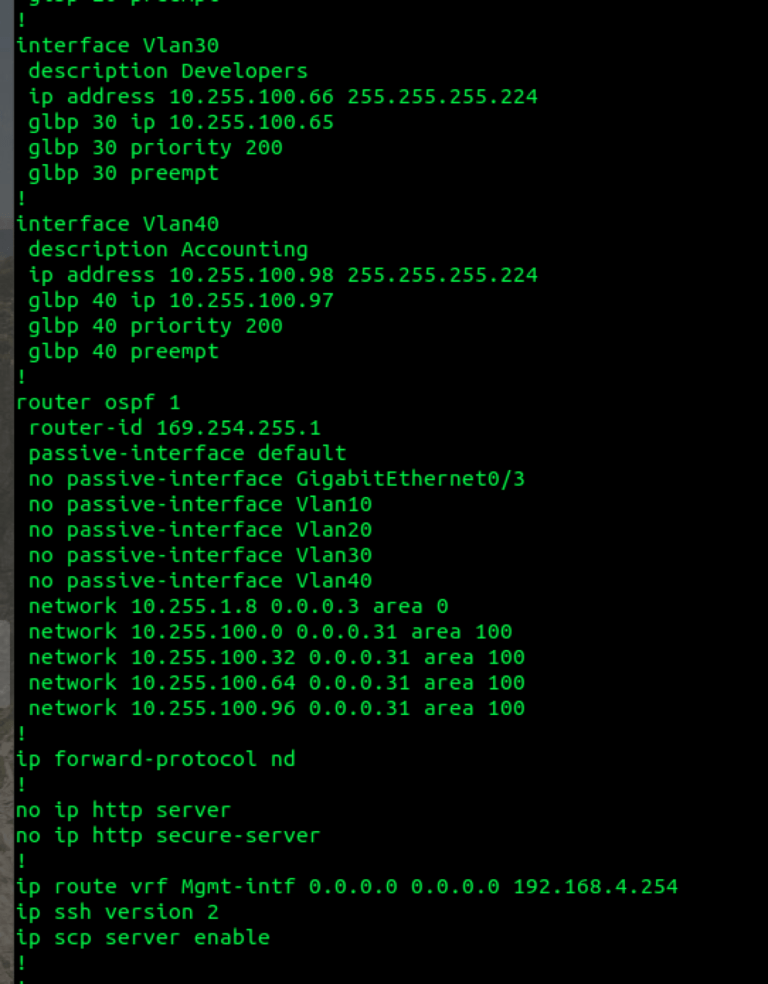
Full example of HQ-DIS1 device,
HQ-DIS1 (HQ-DIS1.yaml)
# HQ-DIS1
# Connection variables
ansible_user: 'cisco'
ansible_ssh_pass: 'cisco'
ansible_connection: network_cli
ansible_network_os: ios
# for (commit-merge-final-config.yml)
config_file: FINAL.conf
# for (generate-all-config-and-make-diff.yml)
commit_changes: False
replace_config: False
# for napalm_install_config (Modules)
config_dir: /home/dmitrii/PycharmProjects/nac/Ansible/inventories/development/CONFIGS
# Templates variables
########
# Base #
########
hostname: HQ-DIS1
timezone: NZDT 13 0
ntp_server: 10.255.255.2
#########
# STP #
#########
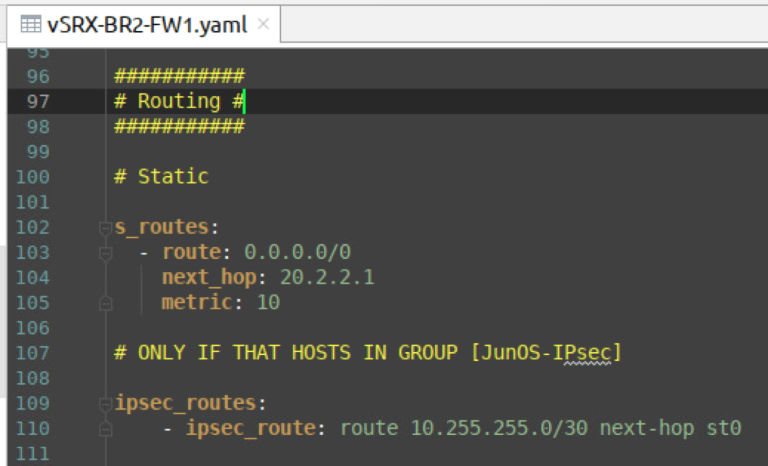
stp_mode: rapid-pvst
# ROOT for (1,10,20,30,40 VLANS)
# stp(ios.j2)
stp_vlan:
- vlan_number: 1
vlan_priority: 0
- vlan_number: 10
vlan_priority: 0
- vlan_number: 20
vlan_priority: 0
- vlan_number: 30
vlan_priority: 0
- vlan_number: 40
vlan_priority: 0
#########
# VTP #
#########
vtp_mode: vtp mode off
#########
# VLANS #
#########
# vlans-j2
vlans:
- vlan_number: 10
vlan_name: Sales
- vlan_number: 20
vlan_name: Managers
- vlan_number: 30
vlan_name: Developers
- vlan_number: 40
vlan_name: Accounting
##############
# Interfaces #
##############
# Interfaces:vars
int_mgmt: 'GigabitEthernet0/0'
int_gi1: 'GigabitEthernet0/1'
int_gi2: 'GigabitEthernet0/2'
int_gi3: 'GigabitEthernet0/3'
int_gi4: 'GigabitEthernet1/0'
int_gi5: 'GigabitEthernet1/1'
int_gi6: 'GigabitEthernet1/2'
int_gi7: 'GigabitEthernet1/3'
int_gi8: 'GigabitEthernet2/0'
int_gi9: 'GigabitEthernet2/1'
int_gi10: 'GigabitEthernet2/2'
int_gi11: 'GigabitEthernet2/3'
int_gi12: 'GigabitEthernet3/0'
int_gi13: 'GigabitEthernet3/1'
int_gi14: 'GigabitEthernet3/2'
int_gi15: 'GigabitEthernet3/3'
int_vlan10: 'Vlan10'
int_vlan20: 'Vlan20'
int_vlan30: 'Vlan30'
int_vlan40: 'Vlan40'
int_lo0: 'Loopback0'
int_po1: 'Port-channel1'
trunk_encapsulation: switchport trunk encapsulation dot1q
# Interfaces-j2
interfaces:
- name: "{{ int_lo0 }}"
description: "OSPF RID"
ip: 169.254.255.1 255.255.255.255
shutdown:
- name: "{{ int_vlan10 }}"
description: "Sales"
ip: 10.255.100.2 255.255.255.224
shutdown: no shutdown
- name: "{{ int_vlan20 }}"
description: "Managers"
ip: 10.255.100.34 255.255.255.224
shutdown: no shutdown
- name: "{{ int_vlan30 }}"
description: "Developers"
ip: 10.255.100.66 255.255.255.224
shutdown: no shutdown
- name: "{{ int_vlan40 }}"
description: "Accounting"
ip: 10.255.100.98 255.255.255.224
shutdown: no shutdown
# Interfaces-j2(ios_l2_to_l3.j2)
interface_l2_to_l3:
- name: "{{ int_gi3 }}"
description: "TO_HQ1-CO1"
ip: 10.255.1.10 255.255.255.252
shutdown:
# Interfaces-j2(ios_trunk.j2)
interfaces_trunk:
- name: "{{ int_gi5 }}"
description: "TO_HQ-AC1"
dtp: switchport nonegotiate
shutdown:
- name: "{{ int_gi6 }}"
description: "TO_HQ-AC2"
dtp: switchport nonegotiate
shutdown:
- name: "{{ int_gi8 }}"
description: "TO_HQ-AC4"
dtp: switchport nonegotiate
shutdown:
- name: "{{ int_gi9 }}"
description: "TO_HQ-AC3"
dtp: switchport nonegotiate
shutdown:
# Interfaces_l2_channel-j2
interfaces_l2_channel:
- name: "{{ int_gi1 }}"
description: "TO_HQ-DIS2"
po_number: 1
po_mode: active
shutdown:
- name: "{{ int_gi2 }}"
description: "TO_HQ-DIS2"
po_number: 1
po_mode: active
shutdown:
interfaces_po:
- name: "{{ int_po1 }}"
description: "TO_HQ-DIS2-LACP"
mode: trunk
dtp: switchport nonegotiate
shutdown:
# FHRP-j2
interfaces_glbp:
- name: "{{ int_vlan10 }}"
glbp_group: 10
glbp_priority: 200
preempt: glbp 10 preempt
glbp_ip: 10.255.100.1
glbp_load_balancing: round-robin
- name: "{{ int_vlan20 }}"
glbp_group: 20
glbp_priority: 200
preempt: glbp 20 preempt
glbp_ip: 10.255.100.33
glbp_load_balancing: round-robin
- name: "{{ int_vlan30 }}"
glbp_group: 30
glbp_priority: 200
preempt: glbp 30 preempt
glbp_ip: 10.255.100.65
glbp_load_balancing: round-robin
- name: "{{ int_vlan40 }}"
glbp_group: 40
glbp_priority: 200
preempt: glbp 40 preempt
glbp_ip: 10.255.100.97
glbp_load_balancing: round-robin
###########
# Routing #
###########
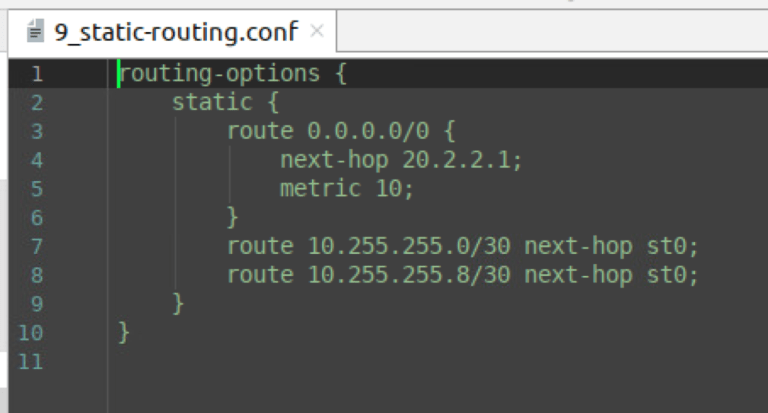
# Static
# Dynamic
## OSPFv2
### Area 0 and 100
ospf_proccess: 1
router_id: 169.254.255.1
# passive-interface default
no_passive_ints:
- int: "{{ int_vlan10 }}"
- int: "{{ int_vlan20 }}"
- int: "{{ int_vlan30 }}"
- int: "{{ int_vlan40 }}"
- int: "{{ int_gi3 }}"
networks:
- net: 10.255.1.8 0.0.0.3 area 0
- net: 10.255.100.0 0.0.0.31 area 100
- net: 10.255.100.32 0.0.0.31 area 100
- net: 10.255.100.64 0.0.0.31 area 100
- net: 10.255.100.96 0.0.0.31 area 100Configuration on the device: